Quick Start
From an empty server to a working AI website builder, your first published site and a Flutter app build.
The Fast Path
Who does what? Steps 1–4 and 7 below are one-time server / developer tasks (upload, DNS, SSL, Node.js build, cron and worker, Flutter build). Everything after that — branding, homepage, AI keys, payment keys, plans, mail, push — is done in the browser in the admin panel, without code. Full list: Start Here: Who Does What. Minimum set-up before launch: Ready to Go Live?
Buildora has two web parts that are deployed separately, plus the mobile app: the backend (Laravel: REST API, super-admin panel, web installer and the published websites) and the frontend (Next.js: landing page, sign-up/login, workspace dashboard and the visual editor). On a VPS with SSH, PHP 8.3+, MySQL 8 and Node.js 20.9+ the steps below take about 45 minutes, plus DNS propagation time.
1. Backend & installer
Upload backend/, point api.example.com at backend/public, open /install.
2. Frontend
Set NEXT_PUBLIC_API_URL, npm ci && npm run build, run it with PM2 behind Nginx (or deploy to Vercel).
3. Cron & worker
One cron line and one Supervisor queue worker (or a second cron line on shared hosting).
Open →4. AI & first site
Add your AI provider key in Admin → AI Studio → Providers, then generate a website.
Open →What Is in the Package
| Folder | Contents |
|---|---|
Main_Files/WebSourceCode/backend | Laravel 13 app: REST API /api/v1, Filament super-admin panel /admin, web installer /install, publishing engine that serves your users’ websites, migrations, seeders, Artisan commands and the Pest test suite |
Main_Files/WebSourceCode/frontend | Next.js 16 app: marketing site, auth screens, workspace dashboard, visual editor, AI builder and business suite |
Main_Files/AppSourceCode | The Flutter app (one code base for Android and iOS) with its README.md |
documentation | This documentation: Quick Start, Common Setup, Web Platform, Mobile App and Screenshots pages |
Plain, readable PHP, TypeScript and Dart: no encoded files. backend/vendor/ is not included in the download: run composer install --no-dev --optimize-autoloader once (on your computer if your host has no SSH, then upload the folder). node_modules/ is never shipped: npm ci creates it.
Requirements
| Part | Needs |
|---|---|
| Backend | PHP 8.3+ with bcmath ctype curl dom fileinfo json mbstring openssl pdo pdo_mysql tokenizer xml zip intl and gd or imagick; memory_limit ≥ 256M, max_execution_time ≥ 120; writable storage/, bootstrap/cache/ and .env. Composer 2 (vendor/ is not included in the download). |
| Database | MySQL 8.0+ or MariaDB 10.6+ (utf8mb4). The web installer supports MySQL only; SQLite is for local development. |
| Frontend | Node.js 20.9+ (22 LTS recommended) and npm, or a Node host: Vercel, Netlify, Render or cPanel Setup Node.js App. |
| Background jobs | Cron every minute (required) and a long-running queue worker (Supervisor/systemd, strongly recommended). |
| DNS | A records for the frontend and API hosts and a wildcard record *.sites.example.com for published websites. |
| Mobile app (optional) | Flutter stable with Dart 3.12+, Android Studio, and a Mac with Xcode for iOS. See Mobile App → Requirements. |
The installer’s Requirements step checks the PHP side for you.
Plan Your Domains
Decide the host names before you install; the installer asks for them. Only APP_URL and FRONTEND_URL go into .env; the sites domain and server IP are stored in the database (Settings → Platform). All names below are examples.
| Host | Points to | Where it is set |
|---|---|---|
example.com | Frontend (Next.js) | FRONTEND_URL=https://example.com |
api.example.com | backend/public (API, admin at /admin, installer) | APP_URL=https://api.example.com |
sites.example.com + *.sites.example.com | backend/public (wildcard: published sites; bare name: isolated draft previews) | Sites domain sites.example.com (installer / Settings → Platform) |
customer-domain.com | backend/public as the default vhost | Server IP = the A-record target shown to users (installer / Settings → Platform) |
The frontend and the API must share a parent domain (example.com + api.example.com, or app.example.com + api.example.com). The dashboard signs in with a Sanctum session cookie scoped to .example.com; two unrelated domains will not work. A separate domain for published sites (for example mysites.com) is recommended in production because user sites can contain custom HTML/JS. Never use the parent domain of the API host as the sites domain (not example.com for api.example.com).
1. Install the Backend
Upload the files
/var/www/buildorain the commands on this page is an example install folder (YOUR_APP_FOLDER): replace it with your own path.api.example.com,sites.example.comandexample.comstand for your own API, sites and frontend domains.Run
composer install --no-dev --optimize-autoloaderinbackend/(on your computer if the host has no SSH;vendor/is not shipped), then upload the contents ofbackend/includingvendor/, for example to/var/www/buildora/backend, and point the document root ofapi.example.comand*.sites.example.comatbackend/public. Never expose the project root.Make folders writable
chown -R www-data:www-data storage bootstrap/cacheandchmod -R 775 storage bootstrap/cache; the installer also needs to write.env.Create an empty database
Charset
utf8mb4, and a user with all privileges on it.Open the installer
https://api.example.com/install: Welcome → Requirements → Database → Migrate → Admin → Settings → Finish. The Settings step asks for the app name, Frontend URL, sites domain, server IP, timezone, currency, language, purchase code and SMTP; it saves the frontend URL, sites domain, server IP, Sanctum hosts and mail to thesettingstable and writesAPP_NAME,APP_URL,APP_TIMEZONE,APP_LOCALE,SESSION_DOMAINandSESSION_SECURE_COOKIEto.env. Finish runsstorage:link, switches toAPP_ENV=production/APP_DEBUG=false, setsAPP_INSTALLED=trueand locks the installer (/installthen answers 403). The lock isAPP_INSTALLED=trueplus the persistentstorage/installedmarker (and the super admin in the database), so a lost.envcannot reopen/install. To reinstall on purpose, deletestorage/installed, setAPP_INSTALLED=falseand use an empty database, or runphp artisan buildora:install --force.
CREATE DATABASE buildora CHARACTER SET utf8mb4 COLLATE utf8mb4_unicode_ci;
CREATE USER 'buildora'@'localhost' IDENTIFIED BY 'a-strong-password';
GRANT ALL PRIVILEGES ON buildora.* TO 'buildora'@'localhost';
The installer seeds roles, plans, settings, AI actions, the component library, templates, the AI providers, languages and the default homepage photos (CoreSeeder, SettingSeeder, ComponentLibrarySeeder, TemplateSeeder, AiSeeder, LanguageSeeder, HomepageImagesSeeder; these also run on every buildora:update), plus, on install only, the e-mail templates, branding and homepage content (EmailTemplateSeeder, BrandingSeeder, HomepageSeeder), so your edits survive updates. It creates no demo data and no demo accounts unless APP_DEMO=true is set in backend/.env before installing (public demos only; see Demo Mode).
Prefer the command line? On a VPS the same steps run in one command:
cd /var/www/buildora/backend
composer install --no-dev --optimize-autoloader     # creates vendor/ (not included in the download)
cp .env.example .env && php artisan key:generate
# edit .env: APP_URL, FRONTEND_URL, DB_HOST, DB_DATABASE, DB_USERNAME, DB_PASSWORD — nothing else
php artisan buildora:install \
    [email protected] --admin-password='a-strong-password' \
    --app-url=https://api.example.com --frontend-url=https://example.com \
    --sites-domain=sites.example.com --app-name="My Builder"
chown -R www-data:www-data storage bootstrap/cache
php artisan config:cache && php artisan route:cache && php artisan view:cache
Web server examples (Nginx, Apache, Caddy) and the wildcard SSL certificate are in Common Setup → Web Server.
2. Deploy the Frontend
NEXT_PUBLIC_* values are baked in at build time, so create frontend/.env.production before building:
NEXT_PUBLIC_API_URL=https://api.example.com
NEXT_PUBLIC_APP_NAME=My Builder
NEXT_PUBLIC_GOOGLE_LOGIN=true
Option 1: Node server on your VPS (recommended). Build once, then keep it running with PM2 on port 3000:
cd /var/www/buildora/frontend
npm ci && npm run build
npm install -g pm2
pm2 start "npm run start -- -p 3000" --name buildora-frontend
pm2 save && pm2 startup
Then reverse-proxy example.com to http://127.0.0.1:3000 with Nginx (example in Common Setup).
Option 2: Vercel / Netlify / Render. Import the frontend/ folder as a Next.js project, set the same variables in the dashboard, deploy and attach example.com. The frontend only talks to NEXT_PUBLIC_API_URL.
Option 3: cPanel “Setup Node.js App”. Build locally (npm ci && npm run build), upload frontend/ including .next/, public/, package.json, package-lock.json and next.config.ts. Choose Node 20+, application root = the uploaded folder, startup file node_modules/next/dist/bin/next with argument start, run NPM install and start the app. If your host has no Node.js support use Option 2.
Until the backend is installed, every frontend page redirects to the backend installer; if the backend cannot be reached the frontend answers a temporary 503. After changing any NEXT_PUBLIC_* value, run npm run build again and restart (pm2 restart buildora-frontend).
3. First Login
Super-admin panel
Open
https://api.example.com/adminand sign in with the account you created in the installer.System info
Settings → System info (
/admin/system) shows PHP/Laravel/database versions, drivers, extensions, queue backlog, the scheduler heartbeat, disk space and the cron line to add. On the server,php artisan buildora:doctorprints PASS / WARN / FAIL with a fix hint for each check.Brand it
Settings → General: app name, support e-mail, language, timezone, currency, app icon, light and dark logo, favicon. The public pages (homepage, About, Contact, Pricing page copy and FAQ, Blog and the Terms / Privacy / Refund pages, with their photos and Bengali / Arabic translations) are edited in Site Library → Homepage: save a draft, preview, publish.
Review the plans
Plans & Billing → Plans: Free, Starter, Pro and Agency are seeded. Edit prices, trial days, limits and features; keep one plan marked default.
The workspace app
Open
https://example.com. Your admin account has its own workspace, or register a normal account to see what customers see.
4. Cron & Queue
Add one cron entry for the web-server user (crontab -u www-data -e). It runs domain checks, renewals, scheduled blog posts and campaigns, clean-ups and the heartbeat shown in System info:
* * * * * cd /var/www/buildora/backend && php artisan schedule:run >> /dev/null 2>&1
AI site generation, translations, publishing jobs, SSL provisioning, e-mails and exports run on the queue (QUEUE_CONNECTION=database, written by the installer). Keep a worker running with Supervisor (full config in Common Setup):
php /var/www/buildora/backend/artisan queue:work database --sleep=3 --tries=3 --max-time=3600 --timeout=1500
Shared hosting without Supervisor: add a second cron entry that drains the queue every minute; AI generation then starts within a minute of the request.
* * * * * cd /home/YOUR_CPANEL_USERNAME/YOUR_APP_FOLDER/backend && /usr/local/bin/php artisan schedule:run >> /dev/null 2>&1
* * * * * cd /home/YOUR_CPANEL_USERNAME/YOUR_APP_FOLDER/backend && /usr/local/bin/php artisan queue:work --stop-when-empty --max-time=50 >> /dev/null 2>&1
Shared hosting (cPanel) without a long-running worker: add both lines as cron jobs. Replace the placeholders: YOUR_CPANEL_USERNAME is your cPanel username (cPanel → General Information → Home Directory) and YOUR_APP_FOLDER is the folder you uploaded Buildora to, so the path ends in the backend folder that contains artisan. /usr/local/bin/php is the usual cPanel PHP binary; use the PHP 8.3 path your host gives you. On a VPS use the Supervisor worker and the crontab line above instead.
5. Add an AI Provider
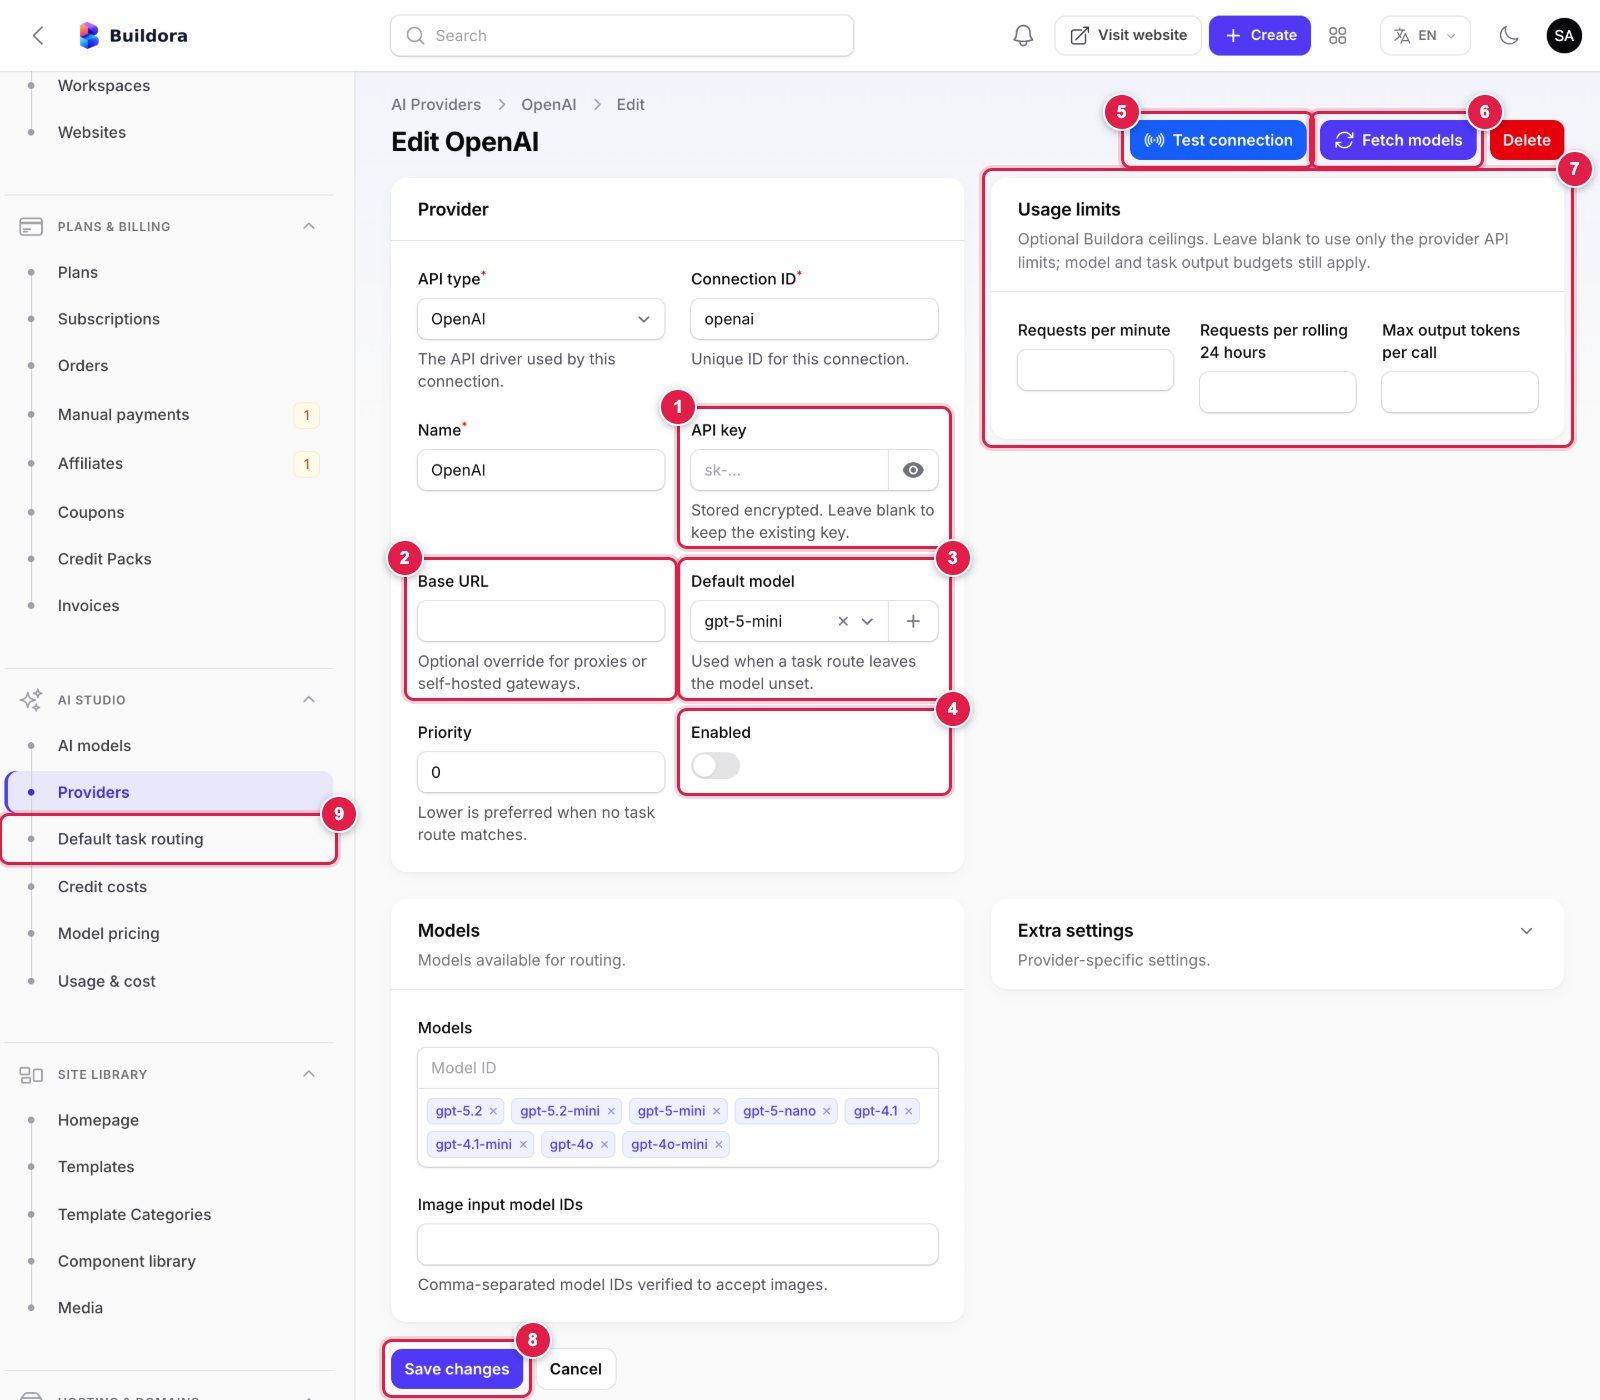
- API key: paste the key from your provider account (OpenAI
sk-…, Anthropic, Gemini, OpenRouter). It is stored encrypted; leave it blank later to keep the stored key. - Base URL: leave empty for the official API; set it only for a proxy or a self-hosted OpenAI-compatible gateway.
- Default model: used when a task route does not name a model.
- Enabled: switch on after the test passes.
- Test connection: sends a tiny request with the saved key and shows the result.
- Fetch models: loads the provider’s current model list into Models.
- Usage limits (optional): requests per minute / per 24 hours and max output tokens, as your own spending guard.
- Save changes before testing.
- Then open Default task routing and pick this provider and model for each task.
All AI providers ship disabled and without keys. Bring your own key from OpenAI, Anthropic, Google Gemini, OpenRouter or an OpenAI-compatible Omniroute gateway. Keys are stored encrypted in the database, not in .env.
Providers
Admin → AI Studio → Providers: open the provider, paste the API key, enable it, then Test connection and Fetch models.
Task routing
AI Studio → Default task routing: pick the primary and fallback provider + model for each task (site generation, copilot, content, translation, images…). AI models holds the branded models your users choose from (the seeded one is “Buildora Flash”); point its routes at your provider.
Costs
Credit costs sets what each AI action costs your users; Model pricing what it costs you; Usage & cost shows the result.
No fake AI in production
Keep
AI_FAKE=falseinbackend/.env.truereturns canned demo content without calling any API.
Command-line alternative:
php artisan ai:provider openai --key=sk-... --enable --test --models
php artisan ai:provider --list        # providers and task routes
6. Your First AI Website
New website
In the workspace dashboard open Websites → New website (
/websites/new) and choose AI build (the other options are a template or a blank site).Describe the business
Write a brief (10–4,000 characters), pick the website type and language, optionally a name.
Plan, then build
The AI panel creates an editable plan (pages and sections), then Approve and build generates the pages. Progress shows each step and page; you can cancel (finished pages are kept) or resume a failed build.
Edit
Refine the result in the visual editor (
/editor/{id}) or ask the AI copilot (Ctrl/⌘+K).Publish
Press Publish. The site is served at
https://{subdomain}.sites.example.com; custom domains are connected under Website → Domains.
If generation stays “queued”, no queue worker is running. If the site opens with a TLS error, the wildcard certificate for *.sites.example.com is missing (see Common Setup → SSL).
7. Build the App
The Flutter app is in Main_Files/AppSourceCode. It needs the URL of your backend and of your web app:
cp env/example.json env/prod.json      # set API_BASE_URL and WEB_APP_URL
flutter pub get
flutter run --dart-define-from-file=env/prod.json
Before publishing, change the package / bundle id (com.buildora.app), the app name, icons and splash, add your own Firebase files for push, select your own Apple team and sign the Android build with your own keystore. Everything is in Mobile App.
Shared Hosting vs VPS
| Topic | Shared hosting / cPanel | VPS |
|---|---|---|
| Backend install | Web installer at /install; set the document root to backend/public | Web installer or php artisan buildora:install |
| Frontend | cPanel Setup Node.js App, or Vercel / Netlify / Render if the host has no Node.js | Node + PM2 behind Nginx |
| Queue | Second cron line with queue:work --stop-when-empty --max-time=50 | Supervisor or systemd worker |
| Published sites | Add a wildcard subdomain *.sites.example.com with the backend document root; AutoSSL covers it on most hosts | Wildcard vhost + wildcard certificate (DNS-01) |
| Custom-domain SSL | Usually issued by the host or Cloudflare | Caddy on-demand TLS or a certbot command (SSL_PROVISIONER=command) |
| Live collaboration | Polling over HTTP: no websocket server is needed on either. | |
Go-Live Checklist
php artisan buildora:doctorshows no FAIL (run it on the server itself).APP_ENV=production,APP_DEBUG=false,APP_INSTALLED=true;APP_KEYbacked up.APP_URLandFRONTEND_URLare your public HTTPS URLs (no trailing slash); no leftoverSANCTUM_STATEFUL_DOMAINS/SESSION_DOMAINplaceholder lines in.env(they are derived from the two URLs).- Settings → Platform: frontend URL, sites domain and server IP are your real values (not
example.com/203.0.113.10). - HTTPS on the frontend, the API host and
*.sites.example.com;curl -I https://test.sites.example.comreturns a Laravel 404, not a TLS error. - Cron added and the scheduler heartbeat is recent; queue worker running;
AI_FAKE=false. - Mail: Settings → Mail → Send test email arrives; SPF/DKIM set.
- At least one AI provider passes Test connection; task routing and credit costs reviewed.
- A sandbox purchase + refund tested, then Stripe / PayPal switched from test / sandbox to live in Settings → Payments with live keys; webhooks registered.
- Storage disk chosen before users upload (media is not migrated between disks).
- Two-factor authentication on the super-admin account; no demo accounts and
APP_DEMOnottrue([email protected],[email protected]come only from demo mode:APP_DEMO=trueorbuildora:install --demo). - Frontend built with the production
NEXT_PUBLIC_API_URL; terms, privacy and refund pages edited for your business (Site Library → Homepage → Legal pages). - Nightly database and
storage/appbackups copied off the server.
Ongoing Costs
The item price covers the source code. Running a SaaS has ongoing costs that you pay to the providers directly, on accounts you open yourself: hosting and domains (including a wildcard certificate if your host does not issue one), e-mail delivery, AI provider usage (OpenAI, Anthropic, Google Gemini, OpenRouter or your gateway), the optional Brave Search API, payment gateway fees (Stripe and PayPal for your plans; your customers pay their own Stripe, PayPal, SSLCommerz or bKash fees), optional S3-compatible storage, an optional Docker hosting VPS, Firebase and Google Cloud for push and Google login, and Apple Developer / Google Play Console accounts for the app. You set your own plan prices and credit costs so that customers cover these costs; AI Studio → Usage & cost shows what AI is costing you.
Where Next
Common Setup
Both .env files, web server, SSL, custom domains, mail, storage, payments, AI, push, cron, queue, updating, backups and troubleshooting.
Open →Web Platform
Every admin and workspace screen: builder, AI, publishing, business suite, billing and languages.
Open →Mobile App
Flutter setup, rebranding, Firebase, Google Sign-In, deep links, release builds, store submission and a screen tour.
Open →